How To Send A Photo On Iphone
Mail is one of the few features that were present in the very first iPhone and had been evolving since then. Sending attachments on iPhone is still an issue; like Emailing a single photo or up to five photos on iPhone is as easy as it seems to go to photos app, select the photo and mail it, but if you want to send more than five photos via Email, things will get pesky. You can't go to the Photos app and select more than five photos to Email to someone else, but you will have to follow a different procedure. Moreover, if you want to send a large photo via the mail app, you won't be able to send files directly via mail. Here are some tips on how to mail photos from an iPhone, iPod Touch, or iPad.
- Part 1. How to Email 1-5 Photos on iPhone?
- Part 2. How to Mail More Than 5 Photos on iPhone?
- Part 3. Troubleshooting Tips for Can't Email Photos from iPhone
- Part 4. Transfer Photos between Any iPhone/iPad/Android Phone
Part 1. How to Email 1-5 Photos on iPhone?
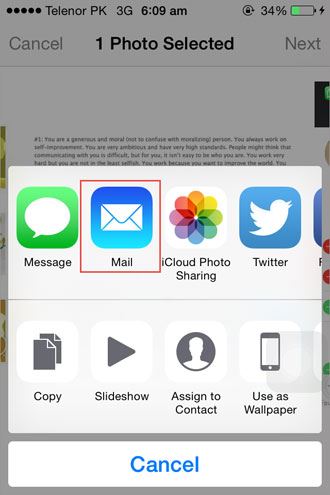
Go to the "Photos" app on your iPhone, open the photo that you want to send via Email on iPhone. Tap on the Options menu at the bottom left corner. You can select up to 5 photos to Email. Tap on the "Next" button at the top right corner. Now, Tap on Mail to send the Photo via Email, Add the Address, subject, details, and hit the send button.
That's it! However, if you have a large library of photos to Email, you won't be able to do that by following the procedure mentioned above. You can follow the procedure given below to send more than five photos.
Part 2. How to Mail More Than 5 Photos on iPhone?
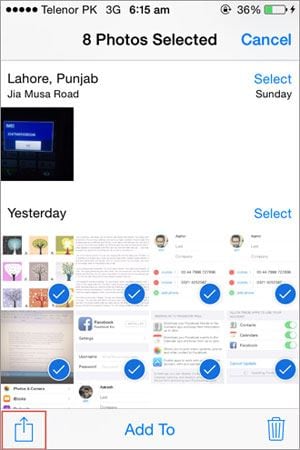
Open Photos and tap on the select button in the top right corner. Select more than five photos that you want to send via Mail. And tap the options button in the bottom left corner. Here's you will find different options, Tap on Copy. Go to the main screen and open the "Mail" application. Tap on the Compose mail button in the bottom right corner. Add the details to whom you want to send the photos. Tap and hold in the message box until you see the "Paste" option. That's it! It will copy all the photos that you want to send, hit the "Send" button and you are good to go.
Sometimes, the photos you are trying to send via Email are so large that when you hit the send button, the Mail application will give you an error, saying the photo is too larger to send. Don't worry, there is an alternative solution to fix that problem. You can use any cloud-based services to fix this problem, such as Dropbox, Box, Google Drive, or any other. We are using Dropbox in this tutorial. It is absolutely free to download, simply download, make an account and transfer the photos to Dropbox. Here's how you can do that.
Part 3. Troubleshooting Tips for Can't Email Photos from iPhone
1) How to Solve "Photos are too large to send" Error?
Step 1: Go to App Store and download the Dropbox on your iPhone. After installation, if you already have an account, Sign-in, otherwise create a new account. Follow some very simple steps to create a new account.
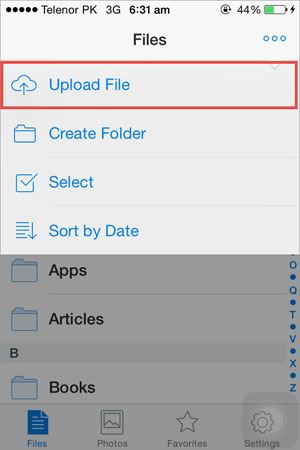
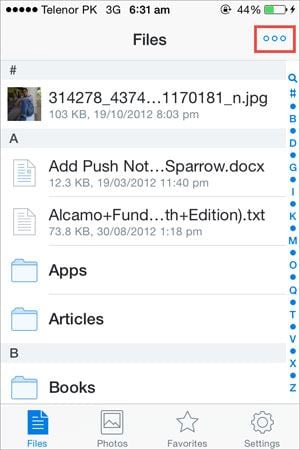
Step 2: After signing in, tap on three dots in the upper right corner. Tap on "Upload File" to upload the photos that are too large. Tap on "Photos". Select the files that you want to upload and hit the "Upload" button in the top right corner.
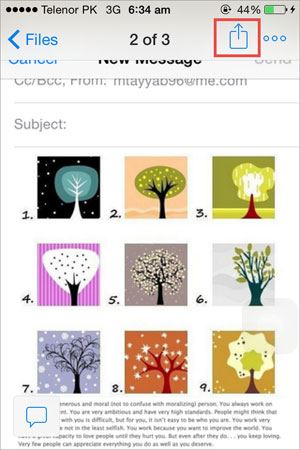
Step 3: After uploading the photo, open the image and tap on "Options" right next to three dots. Now, Tap on Copy Link. Close the drop box and open the Mail application. Hit the Compose button to send a new Email. Add the details and tap and hold to "Paste" the link from Dropbox.
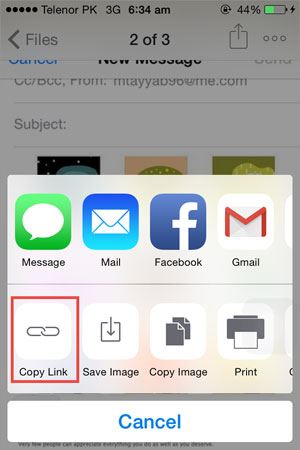
Step 4: A link will be shown, that's it! Hit the "Send" button in the top right corner and you are good to go. Other than these Tips, some users are also facing problems to send photos via mail Application. Here's what those problems are and how you can fix them.
2) Can't Send Photos on Gmail Account via Native Mail Application on iPhone?
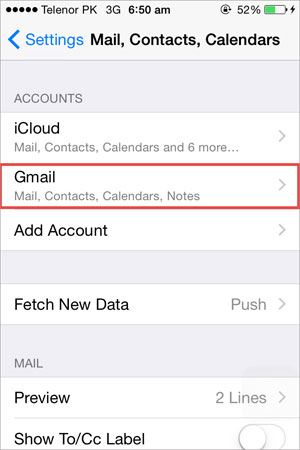
Some users are posting that they can't send photos directly by using the Gmail account on the native mail application. Here's how you can fix this issue.
Go to settings, scroll down and tap on "Mail, Contacts, and Calendars". Select the Gmail Account. Tap on "Delete Account". After deleting the account, restart your iPhone and add a Gmail account again. This will surely help you.
3) Can't Send Message or Email Photos from iPhone?
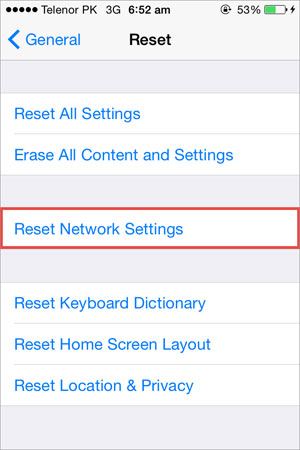
This problem is most likely associated with the network connection on your iPhone. The best way to fix this problem is via "Reset Network Settings".
Go to settings and Tap on General. Scroll down and tap on "Reset". Tap on "Reset Network Settings". Connect with Wi-Fi or cellular and try to send photos again, it should work now.
4) Can I Send Photos Directly from the Mail App on iPhone?
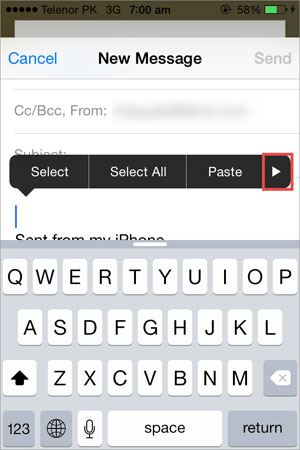
Yes, you can easily send photos directly from the mail app without going to the camera roll or copying the image. Open the mail app and compose a new email. After adding an email address and subject, tap and hold in the message area, tap on the "Arrow" button right next to the paste. Now, select, Insert Photos and Videos and select the photos that you want to send. Boom! It works perfectly on any iPhone running an even older versions of iOS.
Part 4. Transfer Photos between Any iPhone/iPad/Android Phone

dr.fone is a great all-in-one tool that integrates all the features you need for managing music, videos, photos, contacts, and even text messages on iPhone: export files on iPhone to computer/iTunes, delete files on iPhone, transfer files between iPhone, iPad, and Android devices.
- Transfer music, videos, playlists, and more from iPhone to iTunes Library/PC/Mac.
- Backup photos from iPhone, iPad, and Android photo to Mac/PC.
- Transfer music, video, photos, and more between 2 devices: iPhone, iPad, iPod, and Android phone.
- Fix "iPhone, iPad, iPod won't connect to computer" issues.
How To Send A Photo On Iphone
Source: https://www.iskysoft.com/mobile-tips/email-photos-from-iphone.html
Posted by: pennystoing.blogspot.com

0 Response to "How To Send A Photo On Iphone"
Post a Comment